
In addition, according to The Parenting Passageway, "A different grain for each day is...connected to the cosmic origins of the days of the week. A different grain a day fits in with the nourishing weekly rhythm the Kindergarten thrives on."
The website continued, "The most common listing of grains...is the following, taken from The Waldorf Kindergarten Snack Book:
Sunday (Sun): Wheat
Monday (Moon): Rice
Tuesday (Mars): Barley
Wednesday (Mercury); Millet
Thursday (Jupiter): Rye
Friday (Venus): Oats
Saturday (Saturn): Corn
"Waldorf teachers and those who cook with whole grains attribute different properties to different grains. According to The Waldorf Kindergarten Snack Book, wheat is often seen as a harmonizer of the organ systems; rice is seen as acting on the digestive system; barley is seen as strengthening to the connective ligaments due to a high silica content and also seen to be soothing to the mucous membranes of the stomach and intestines; millet is seen to have warming properties; rye nourishes the head and bones; oats loosens stiffness and increases stamina and resistance to disease; and corn stimulates the metabolism in muscles."
I thought it would be interesting to try following the Waldorf Grain Schedule for a week using recipes I found on Pinterest that I've wanted to try now for some time. On the schedule I used this past week, I switched two days (Tuesday and Friday). Otherwise, everything matches the above schedule.
Sunday - Wheat
This pin for Baked Cheese Sticks led to the Living Well Kitchen. The recipe called for using cheese sticks. These are well-enjoyed by Olivia, and I forgot to tell her that I was going to use the package of cheese sticks for a recipe. Needless to say, between the time they went into the refrigerator and Sunday, only one cheese stick was left.
So, I thought I'd try cutting regular blocks of cheese. I had Swiss cheese and a Monterey Jack cheese on hand. What I found was that the string cheese held its shape whereas the other block cheese melted despite the breaded covering.
I baked the cheese sticks for only 8 minutes. They probably could have baked for less time. They tasted good, despite their flattened appearance.
Baked Cheese Sticks

The only two cheese sticks that retained their shape.
Ingredients (Serves 2)
1/2 cup whole wheat bread crumbs
1/4 tsp salt-free Italian seasoning
1 egg
2 tablespoon water
4 pieces string cheese, cut in half
Instructions
Preheat the oven to 375°F. Line a baking sheet with foil and spray with non-stick spray. Set aside.
In a sandwich sized zip-top bag, mix together the bread crumbs and Italian seasoning. (I put everything in a bowl so as to not waste a bag.)
In a shallow bowl, whisk together the egg and water, and add 2 cheese stick halves, making sure they are well-covered.
Add the egg-coated cheese sticks to the bag with the bread crumbs, and shake until fully coated. Put the cheese sticks back in the egg and shake in the bread crumbs again.
Put the breaded cheese sticks on the prepared baking sheet.
Repeat process with the remaining cheese halves until all are breaded and on the prepared baking sheet.
Spray the tops of the breaded cheese sticks with cooking spray.
Bake in the preheated oven for 8-10 minutes, until the tops are golden brown and the cheese is just starting to melt.

You can tell which ones are cheese sticks and
which ones are from the blocks of cheese.
*~*~*~*~*~*~*~*~*~*~*
Monday - Rice
Today, rather than having a Chinese stir fry over rice (which would be something that I typically would have made for a day focused on rice), I wanted to try Rice Paper Rolled Sandwiches that I saw on this pin on Pinterest. The pin didn't lead to a recipe, so it was up to us to figure out what we wanted to put in the sandwiches.
Rice Paper Rolled Sandwiches

We need more practice rolling the sandwiches.
This was a healthy lunch that included shredded cabbage, avocado, carrots, cucumber, and cilantro. We dipped the sandwiches in peanut sauce.

The ingredients ready to be rolled into a sandwich.
There isn't a lot of filling that is needed for each sandwich. If you put too much, there isn't enough rice paper to stretch around the ingredients.

Sophia rolling a sandwich.
We were surprised at how forgiving and flexible the rice paper is after it soaked in water. The key, we found, is to keep an eye on the rice paper as it soaks. One minute it is hard as a rock and the next minute it seems like if you aren't paying attention, you'll have a soggy clump of rice paper on your hands. Ours didn't get to this point, thankfully. One more minute in the water, though, and it would have reached that level.
Sophia and I thought that these type of sandwiches would be especially good in the summer when the produce from the garden or farmers market is ripe and most flavorful. Adding edible flowers would give the sandwiches a decorative and pretty look.
*~*~*~*~*~*~*~*~*~*~*
Tuesday - Oats
Our dessert after dinner on Tuesday was Chocolate-Peanut Butter Granola Apple Bites. The recipe comes from a pin on Pinterest that doesn't lead to anything. Found another pin that has the recipe.
Sophia and I liked this recipe. Olivia said she liked the peanut butter on the apple, but not the granola.
It's an easy snack and healthy dessert; and we would make the recipe again. It also could be eaten as part of a meal. They would be something that would be good to take on a picnic since the granola sometimes falls off the apple. The birds and wildlife could enjoy eating whatever falls to the ground.
Chocolate-Peanut Butter Granola Apple Bites

A Granny Smith apple covered with
peanut butter and granola.
Ingredients:
2 apples, sliced into wedges (We used Granny Smith which are a bit on the tart side. I think we all would have preferred a sweeter apple)
1/4 cup peanut butter
1/4 cup granola, your favorite
1/4 teaspoon ground cinnamon, for sprinkling (We didn't put cinnamon on the apples)
Semisweet chocolate chips, optional* (We didn't use chocolate chips)

Three ingredients for a simple dessert or snack.
Directions:
Coat the tops of the apple wedges in peanut butter and sprinkle with granola and cinnamon.
Melt chocolate chips in the microwave, stirring in 30 second increments until melted. Be careful not to overheat.
Drizzle wedges with melted chocolate. Set on a large platter and serve.
Tips:
To substitute the chocolate drizzle, you can sprinkle mini chocolate chips on top of the wedges. Or, leave the chocolate out altogether. They’re still delicious.

Olivia eating the apple slice and
determining whether or not she liked it.
If not eating this immediately, brush each side of apple wedges with a little lemon juice to avoid browning. Makes 16-20 wedges.

Sophia with an apple slice covered in
peanut butter and granola.
*~*~*~*~*~*~*~*~*~*~*
Wednesday - Millet
Today's grain is millet. This is not an easy grain to find in grocery stores in rural areas. I could find it at the local grain store in the bulk bird seed section. However, I thought it might be more appropriate to find it elsewhere for human consumption. So, the co-op is the place to go to get millet.
At any rate, I found a pin on Pinterest that led to the Alkaline Sisters website. Interestingly, the website said that millet "...is one of the six most important grains in the world and sustains one-third of the world's population as a significant part of the diets in China, Japan, Manchuria, and some areas of Russia, Africa, India, and Egypt; and it has an amazing 10,000 years of cultivation history in parts of East Asia."
The website noted that, "Millet is an excellent source of manganese, phosphorus, and magnesium - all of which are key minerals required for optimal health that you won’t find in white pasta."
I underestimated the amount of millet I had on hand, so I ended up using couscous along with the millet. What I should have done was cook each grain separately since each had a different length of time it needed to cook. Millet takes about 18 minutes and couscous about 5 minutes. The former needs to simmer and the latter doesn't. Needless to say, the millet was a bit on the firm side while the couscous was overly soft (event though I did take the pan off the stove).
At any rate, once the millet-couscous mixture was added to the other ingredients, the unusual texture of the grains wasn't as obvious. I still like my recipe for tabbouleh that I've had for a good 15+ years. This one didn't seem to have quite as much flavor. It also was missing the black olives and feta cheese I usually include with my tabbouleh.
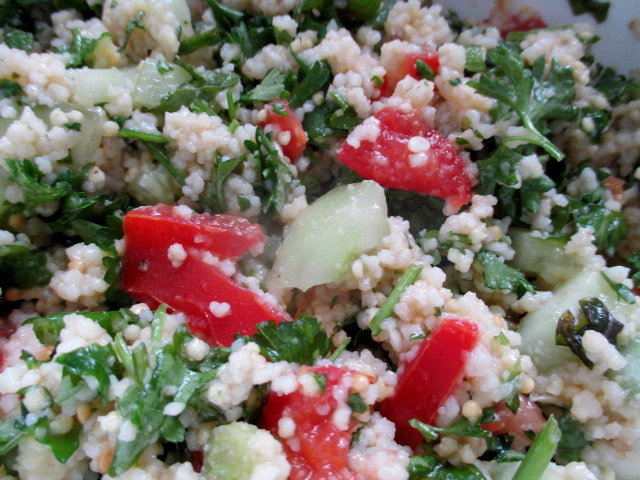
It was nice to have fresh produce in the middle of winter.
Millet Tabbouleh
1 cup millet, rinsed
2 cups filtered water
1 tsp celtic sea salt
1/3 cup extra virgin olive oil
juice of one lemon
1 large garlic clove, crushed
1 1/2 cups roma tomatoes, diced small (3-4 romas)
1 1/2 cups English cucumber, diced small (almost 1 cuke)
3 green onions, sliced finely
1 1/2 cups fresh parsley, chopped small
3/4 cups fresh mint, chopped small
1/2 tsp Maldon sea salt flakes
Directions:
In a medium sauce pan bring water to boil, add millet and then reduce heat to low, simmering with lid on for 18-20 minutes.
Remove from heat, and fluff with a fork. Allow to cool with the lid off for 30-60 minutes. The texture should be firm but not crunchy and neither mushy.
Combine olive oil, lemon juice, and crushed garlic and allow to stand.
Meanwhile chop vegetables as per above descriptions and place in a large bowl.
Add millet when it is completely cool and then pour dressing over mixture. Toss well, seasoning with sea salt to taste.
Garnish with parsley or mint and serve at room temp or chilled. Flavors will become more pronounced after resting. Yield: Approximately 7 cups.
*~*~*~*~*~*~*~*~*~*~*
Rye is Thursday's grain. The recipe I selected is one that I saw on Pinterest that led to All Recipes; and is for Swedish Limpu Bread. Unless it is started right away in the morning, it takes a bit too long for me to make on a weekday.
Thursdays are now our "4-H Day" with some weeks having up to three meetings (club and committee) that run from morning to late afternoon. The best thing to do would be to make this recipe on the weekend when I have a bit more time, and then serve the bread on Thursday.

I am going to let the bread rise more next time and
see how that affects the texture of it.
I'm not sure how to bake it differently so that it doesn't brown quicker
on the sides touching the pan.
It doesn't affect the taste...I just don't like the way it looks.
When I made the bread, the kitchen smelled wonderful. From the scent of orange zest, caraway seeds, and fennel seeds boiling in water on the stove and then cooling in the mudroom to the hours when the bread was rising twice...it made me think back to being a child when my dad would make bread on Sundays.
When it came out of the oven, he would ask if anyone wanted a hot slice of bread with butter (actually it was margarine since it was less expensive). My sister, brother, and I would run up the stairs to the kitchen and wait patiently which he used the electric knife to cut the bread for us. It was such a special treat for us.
This recipe, for Swedish Limpu Bread, makes enough for two loaves of bread. It is a denser - an very flavorful - bread. It tastes equally as good right from the oven or cooled. We all liked it, and I'll definitely make it again.

The bread has two types of seeds and orange rind in it.
Swedish Limpu Bread
Ingredients:
5 1/2 cups all-purpose flour
2 (.25 ounce) packages active dry yeast
2 cups water
1/2 cup packed brown sugar
2 tablespoons vegetable oil
2 teaspoons salt
2 teaspoons orange zest
1 1/2 teaspoons caraway seed
1 1/2 teaspoons fennel seed
2 eggs, room temperature
2 cups rye flour
Directions:
Boil water, sugar, oil, salt, orange rind, caraway seeds, and fennel seeds in a saucepan for 3 minutes. Cool until warm.
In a large bowl, whisk together 3 cups flour and yeast. Stir in cooled orange rind mixture. Beat with an electric mixer on medium speed for 2 minutes. Blend in eggs. Add 1 cup flour, and beat 1 minute on medium speed. Add rye flour and enough additional white flour to make a stiff dough.
Turn dough onto a lightly floured surface. Knead for 8 to 10 minutes, or until smooth and satiny.
Shape into a ball. Place in lightly greased bowl, turning to grease the surface. Cover with a damp cloth, and place in a warm spot. Allow to rise for 1 1/2 hours, or until doubled.
Punch dough down, and divide in half. Shape into 2 balls. Let rest for 10 min. Shape into 2 loaves, and place into ungreased 9 x 5 inch loaf pans. Brush with oil. Allow to rise for 1 hour, or until doubled in size.
Bake at 400 degrees F (205 degrees C) for 30 to 35 minutes, or until done.
*~*~*~*~*~*~*~*~*~*~*
Friday - Barley
Today's recipe is for Barley Beef Soup. The pin on Pinterest led to Better Homes & Gardens.
Had I read the instructions early in the day, I would have noticed that it was supposed to start in the morning in the crock pot. At 5:00 p.m., I realized that I would have to find a quick way to make this soup or we weren't having a normal dinner.
With the exception of Olivia (who isn't a big fan of vegetables or this type of soup), we all enjoyed it and would make this recipe again.
Barley Beef Soup

Beef Barley Soup cooking in the skillet.
Makes: 8 servings Prep: 25 mins Cook: 8 hrs to 10 hrs (low) or 4 to 5 hours (high)
Ingredients
12 ounces beef or lamb stew meat (I used beef stew meat - about 16 ounces)
1 tablespoon vegetable oil
4 14 ounce cans lower-sodium beef broth
1 14 1/2 ounce can diced tomatoes, undrained
1 cup chopped onion (1 large)
1 cup peeled parsnip or potato cut into 1/2-inch pieces (I used a potato)
1 cup frozen mixed vegetables
2/3 cup regular barley
1/2 cup chopped celery (1 stalk)
1 cup bay leaf (I didn't include the bay leaves. One cup also seems like a very high amount. I would maybe do 1 or 2 bay leaves, but certainly not one cup.)
2 cloves garlic, minced
1 teaspoon dried oregano or basil, crushed (I used Italian seasoning instead)
1/4 teaspoon ground black pepper
Directions
Trim fat from meat. Cut meat into 1-inch pieces. In a large skillet, cook meat in hot oil over medium-high heat until brown. Drain off fat.
Transfer meat to a 5- or 6-quart slow cooker. (At this point, I didn't transfer things to a slow cooker. I continued adding everything except the barley to the meat. The barley was cooking separately on the stove. I added it once it was done cooking.) Stir in broth, undrained tomatoes, onion, parsnip or potato, frozen vegetables, barley, celery, bay leaf, garlic, oregano, and pepper.
Cover and cook on low-heat setting for 8 to 10 hours or on high-heat setting for 4 to 5 hours. It didn't take nearly that long - about 30-35 minutes - basically until the barley had cooked and I could add it to the other ingredients in the skillet.
Nutrition Facts (Barley Beef Soup): Per serving: 168 kcal cal., 4 g fat (1 g sat. fat, 25 mg chol., 492 mg sodium, 20 g carb., 3 g fiber, 13 g pro. Percent Daily Values are based on a 2,000 calorie diet
*~*~*~*~*~*~*~*~*~*~*
Today I made Jicama Salsa with Blue Corn Chips. The recipe is from a pin I saw on Pinterest that led to My Recipes.
The fresh produce smelled wonderful on a chilly January day. It was almost as if summer were here again when I tasted the fresh cilantro, green onions, and red bell pepper.
If I were to make this recipe again, I would chop the jicama, pepper, and onion much smaller. This could be made in the Vita-Mix Mixer so that the vegetables all are finely-grated. I think the salsa would stay on the chips and the flavors would blend with one another better.

It's a colorful salsa that looks so bright
when it is on blue corn chips.
Jicama Salsa
Ingredients:
3/4 cup diced, peeled jicama (Note: one jicama makes about 3 batches of this recipe)
1/2 cup chopped red bell pepper
2 tablespoons chopped red onion (I used green and yellow onions instead)
1 minced garlic clove
2 tablespoons chopped fresh cilantro
2 tablespoons fresh lime juice
baked blue corn chips
Directions:
Combine 3/4 cup diced peeled jicama, 1/2 cup chopped red bell pepper, 2 tablespoons chopped red onion, 1 minced garlic clove, 2 tablespoons chopped fresh cilantro, and 2 tablespoons fresh lime juice in a medium bowl. Serve with baked blue corn chips.
1 comment:
What an assortment of interesting recipes and a great way to try all kinds of new grains. I remember you doing something like this before. Looks like fun! :)
Post a Comment